User Guide
System Overview
This system is a visualization control panel based on Home Assistant, offering rich card components and an intuitive interface to help you manage smart home devices more conveniently. Main features include device status monitoring, smart control, automation management, and more.
1. Initialization
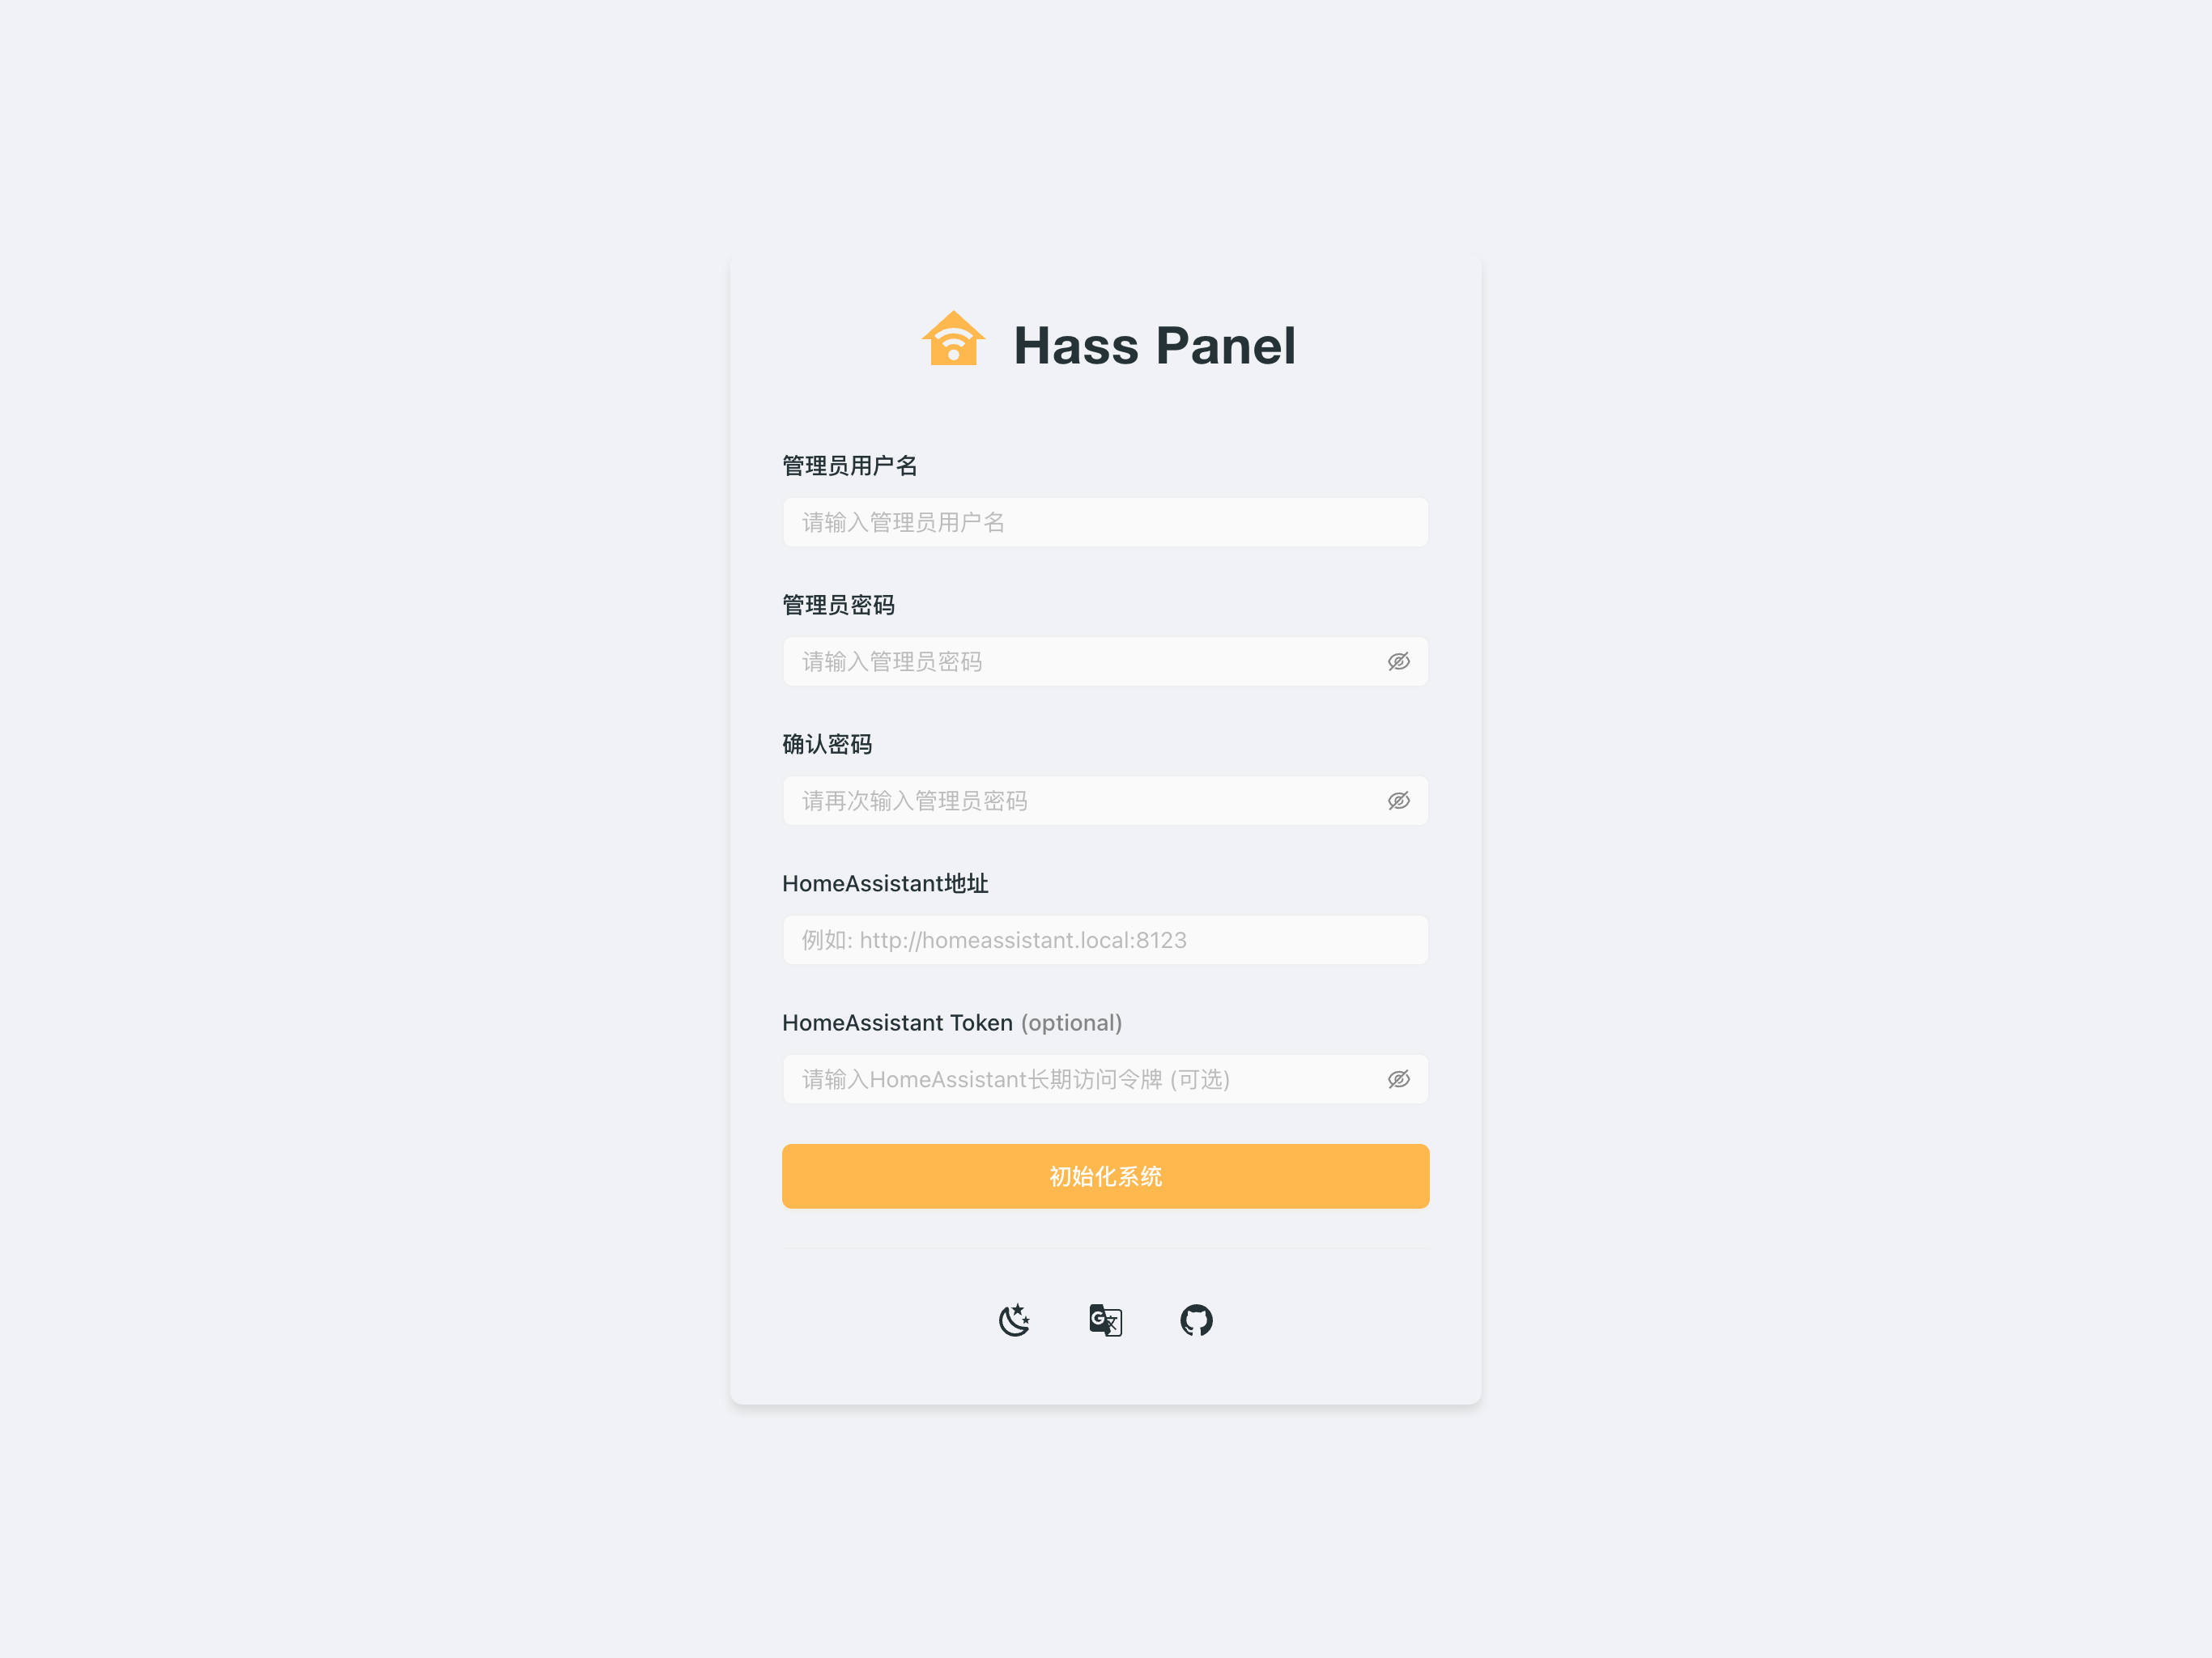
On the initialization page, you need to fill in the following information:
- Administrator Username: Set your administrator account username
- Administrator Password: Set a secure administrator password
- Confirm Password: Re-enter the administrator password for confirmation
- Home Assistant Address: Enter your Home Assistant instance address
- Format example: http://homeassistant.local:8123
- Please ensure the address can correctly access your Home Assistant instance
- Home Assistant Token (optional):
- If your Home Assistant has enabled long-term access token authentication, enter it here
- If not entered, you will be automatically redirected to the Home Assistant login page for authorization after successful login
After filling in all necessary information, click the "Initialize System" button to complete the setup. The system will create an administrator account using this information and redirect to the login page.
2. System Homepage
After successful login, you will enter the system homepage.
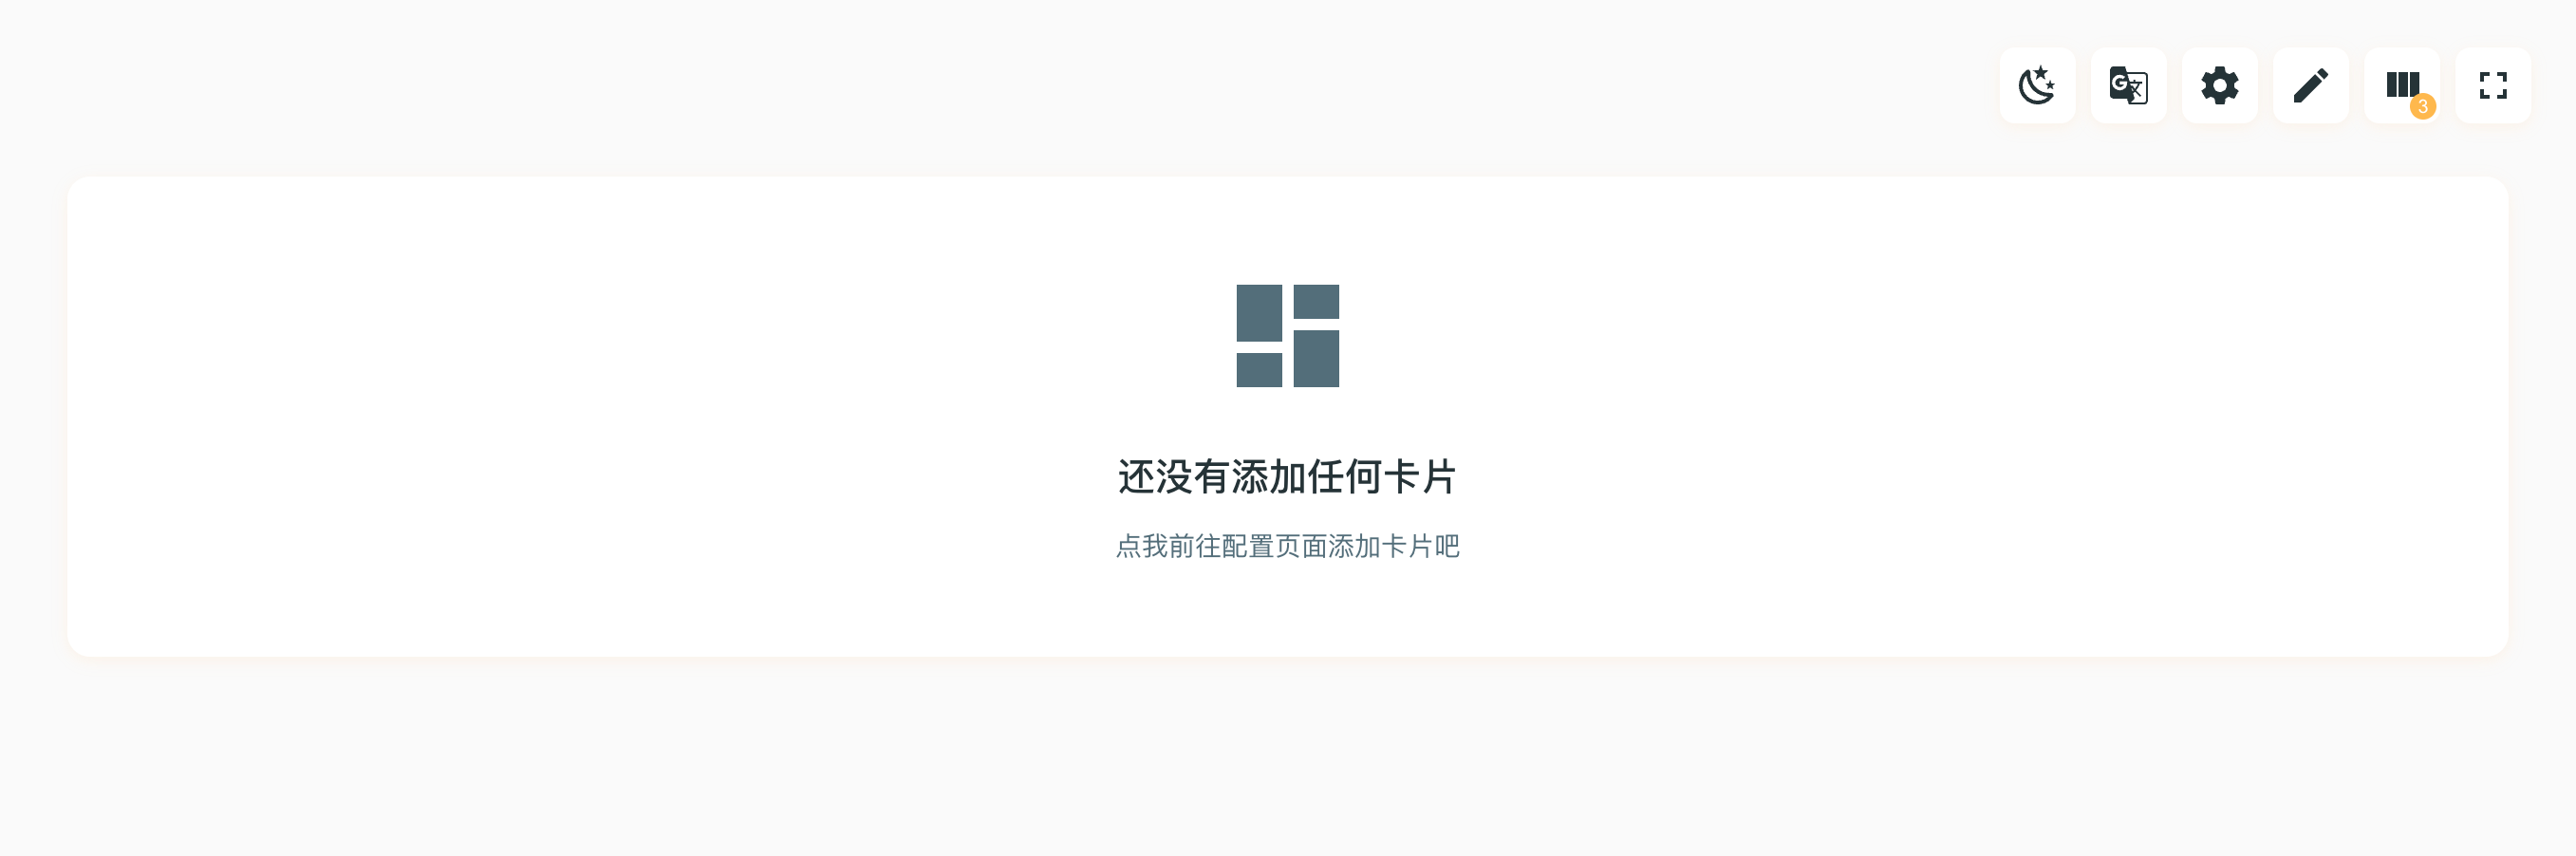
There are six function buttons in the top left corner of the system homepage:
- Night Mode Toggle: Click to switch between light and dark modes for comfortable nighttime use
- Internationalization: Switch system display language, supporting multiple language interfaces
- Configuration: Open the system configuration panel for system-related settings
- Edit: Enter page edit mode to adjust card size and position
- Column Switch: Adjust the number of columns displayed on the page to optimize layout
- Fullscreen: Switch to fullscreen display mode for larger display space
3. System Configuration
You can adjust system-related settings in the system configuration panel.
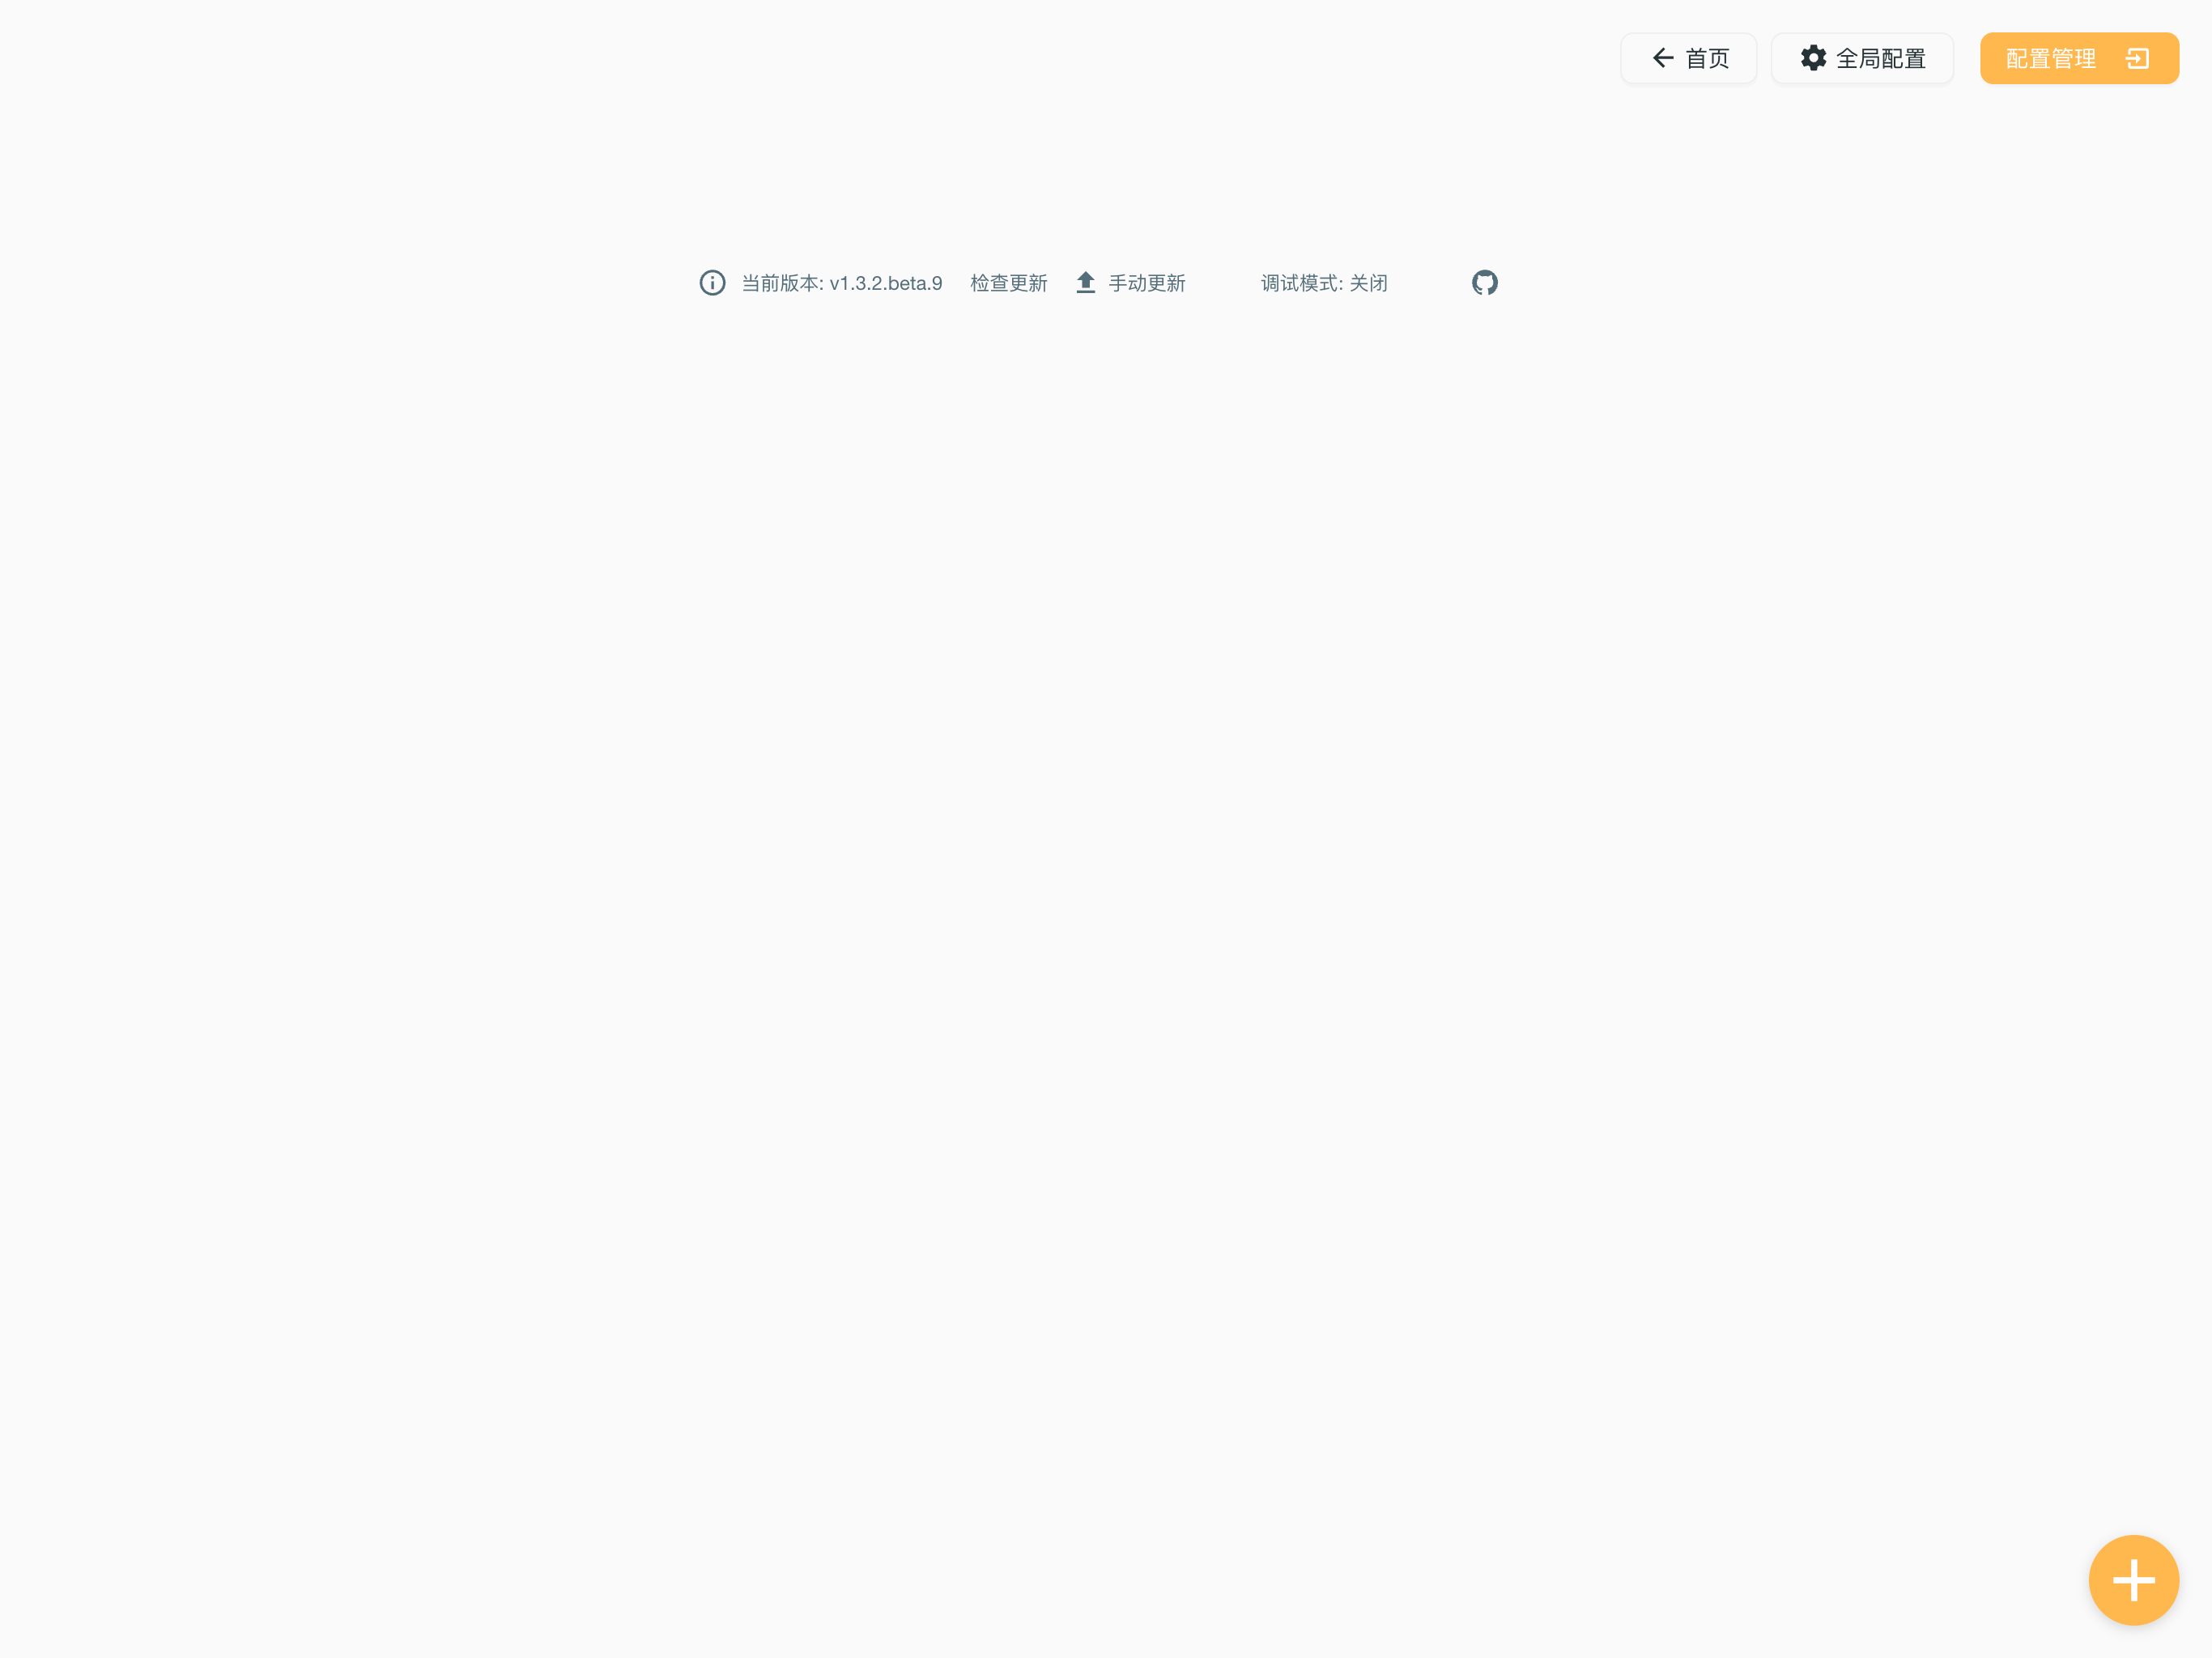
The configuration page provides the following features:
Top Navigation Bar
There are three main buttons in the top right corner:
- Home: Click to return to system homepage
- Global Configuration: Open system global settings panel to configure system-level parameters
- Configuration Management: For importing/exporting system configurations, convenient for backup and migration
Add Card
- There is an Add Card button (+) in the bottom right corner to add new cards to the page
Version Information
At the bottom of the page:
- Current version number
- Check Update button: Click to check if there's a new system version
- Manual Update button: Upload update package manually
- System-related links: Request help, close, etc.
- GitHub repository link: Access project source code
4. Adding Cards
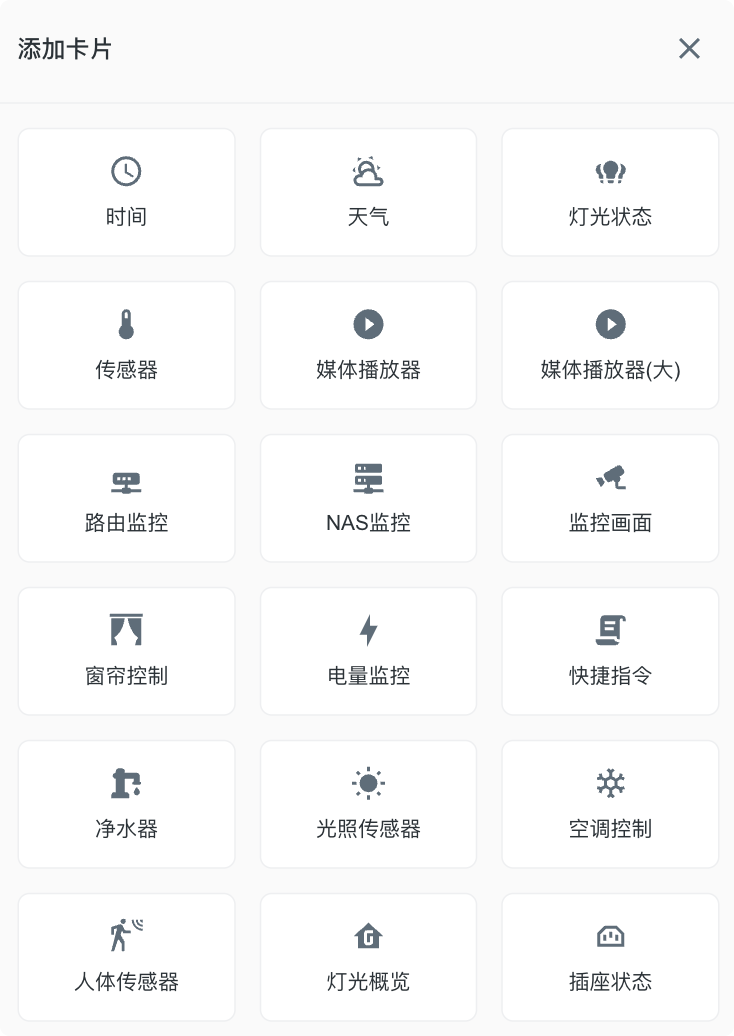
There is an Add Card button (+) in the bottom right corner to add new cards to the page. On the add card page, you can select the card type and configure the card.
Card Types
The system provides various types of cards to choose from:
-
Information Display
- Time: Display current time information
- Weather: Display weather forecast information
- Sensor: Display various sensor data
- Power Monitoring: Monitor device power consumption
-
Lighting Control
- Light Status: Display and control individual lighting devices
- Light Overview: Visualize whole-house lighting status
- Light Sensor: Monitor ambient light levels
-
Smart Appliances
- AC Control: Control air conditioner temperature and mode
- Curtain Control: Control smart curtains
- Water Purifier: Display water purifier status and control
- Socket Status: Control smart sockets
-
Security Monitoring
- Surveillance: Display camera monitoring feed
- Motion Sensor: Detect human activity
- Router Monitoring: Display router-related information
- NAS Monitoring: Monitor network storage device status
-
Entertainment System
- Media Player: Control audio/video playback devices
- Media Player (Large): Larger size media control interface
-
Automation
- Quick Commands: Execute preset automation commands
Usage Method
- Click the add button (+) in the bottom right corner to open the add card page
- Select the desired card type from the card list
- Configure the parameters according to the selected card type
- After configuration, the card will be added to the main page
- Adjust card size and position through edit mode
5. Card Configuration
You can configure cards in detail when adding or editing them. Taking the light status card as an example:
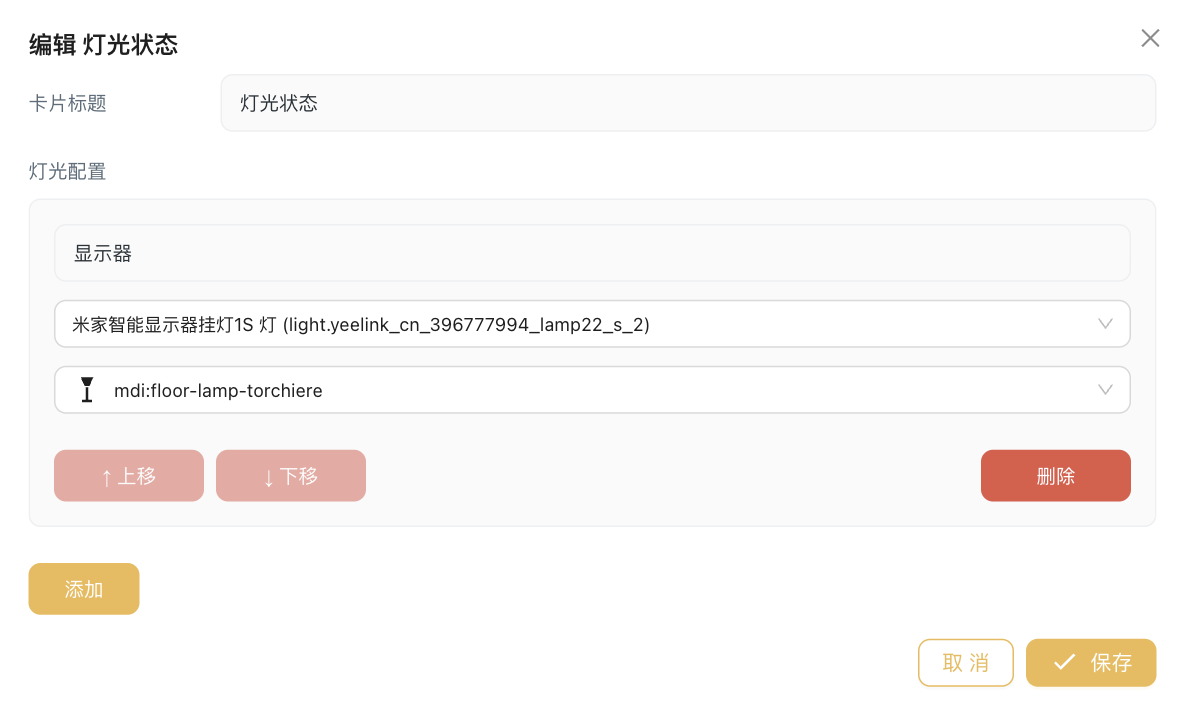
Configuration Items
-
Card Title
- Set the card title displayed on the page
- Can be customized according to device purpose or location, such as "Living Room Light", "Master Bedroom Lamp", etc.
-
Device Configuration
- Light Name: Enter the name of the light to control
- Select Entity ID: Choose the light entity ID to control
- Icon: Select the icon displayed for the device
- System provides a rich icon library
- Choose icons that best match device characteristics, such as floor lamp, chandelier, etc.
Operation Buttons
- Add: Add more devices to the current card
- Move Up/Down: Adjust display order of multiple devices
- Delete: Remove unwanted devices
Save Settings
- Cancel: Discard current modifications and return
- Save: Confirm configuration and save changes
Usage Tips
- Device names should be easily identifiable, such as naming by room or function
- Multiple related devices can be added to one card for centralized control
- Use up/down movement to place frequently used devices at the front
- After configuration, adjust card size and position in homepage edit mode
6. Card Management
You can manage cards in the configuration page.
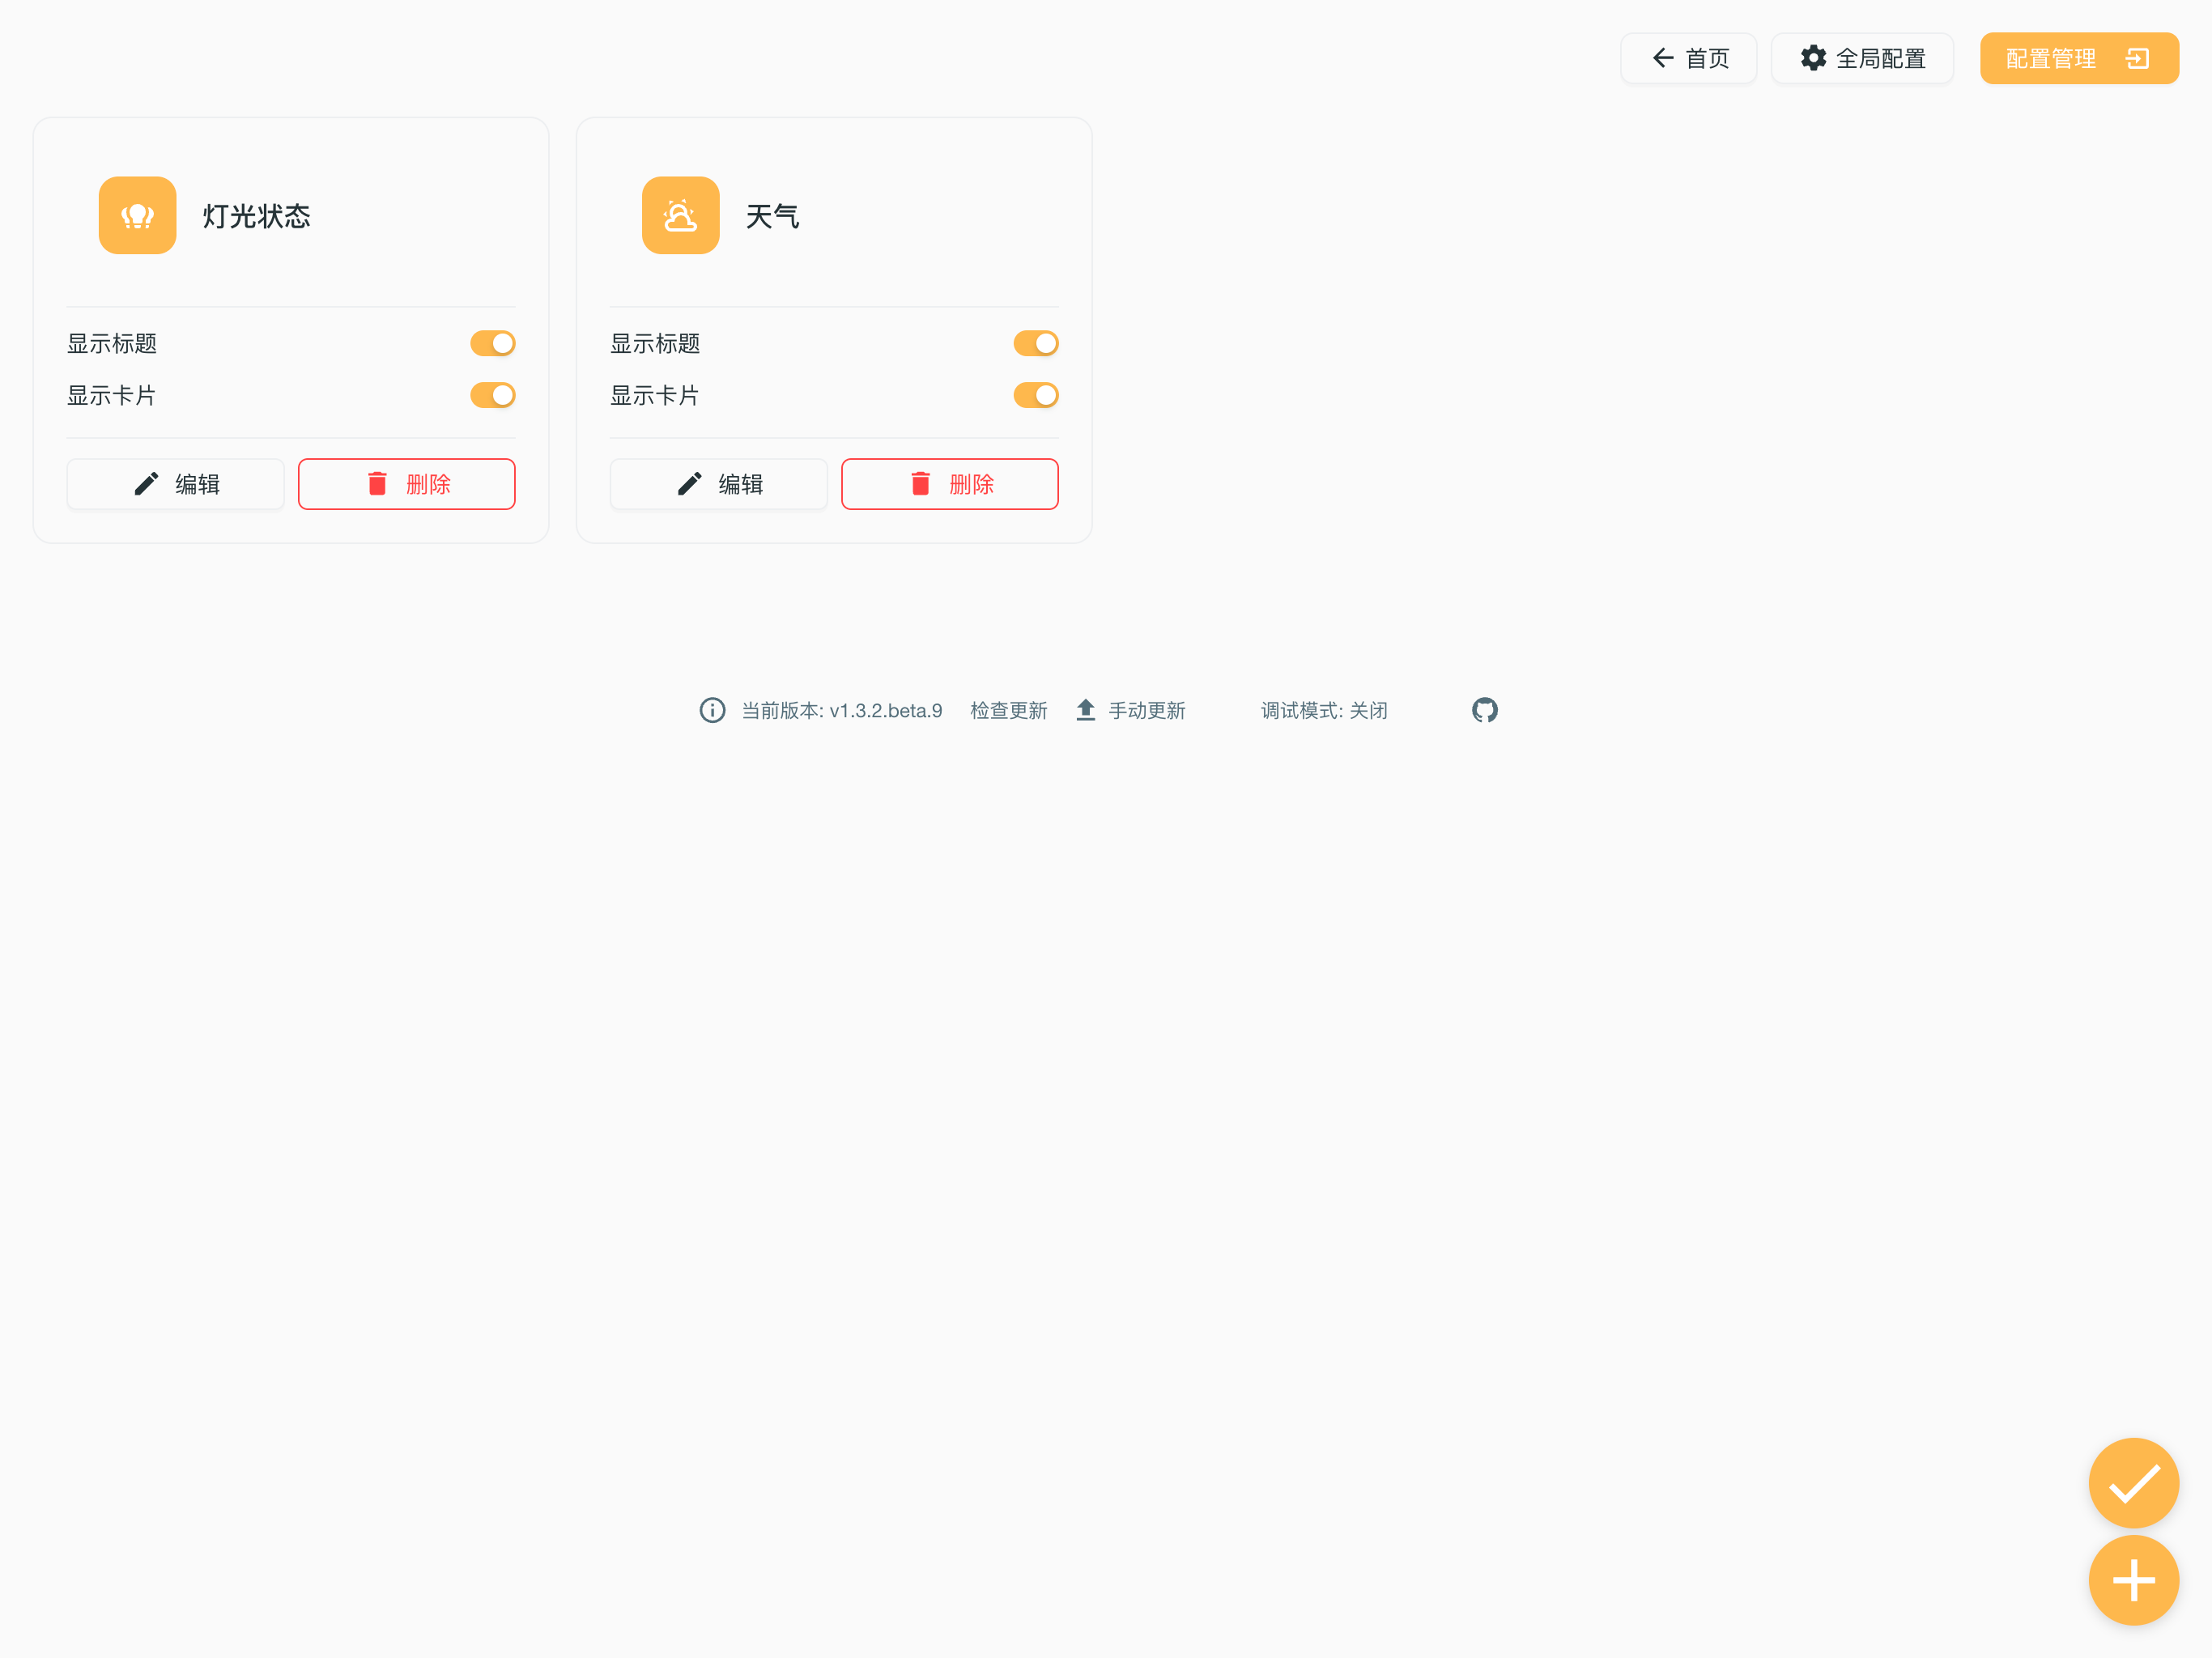
Card List
Each card contains:
- Card Icon and Name: Visually display card type and title
- Display Control
- Show Title: Control whether to display card title on homepage
- Show Card: Control whether to display the card on homepage
Card Operations
Each card has two operation buttons on the right:
- Edit: Click pencil icon to enter card configuration page for detailed settings
- Delete: Click trash bin icon to delete the card
Add New Card
- Click Add button (+) in bottom right corner to add new cards
- Click Save button (✓) in bottom right corner to save all current changes
Usage Tips
- Optimize interface layout by showing/hiding titles
- Temporarily hide infrequently used cards instead of deleting
- Save promptly after batch modifications
- Confirm before deletion, as deleted cards need to be re-added and configured
7. Homepage Editing
You can edit the homepage in edit mode.
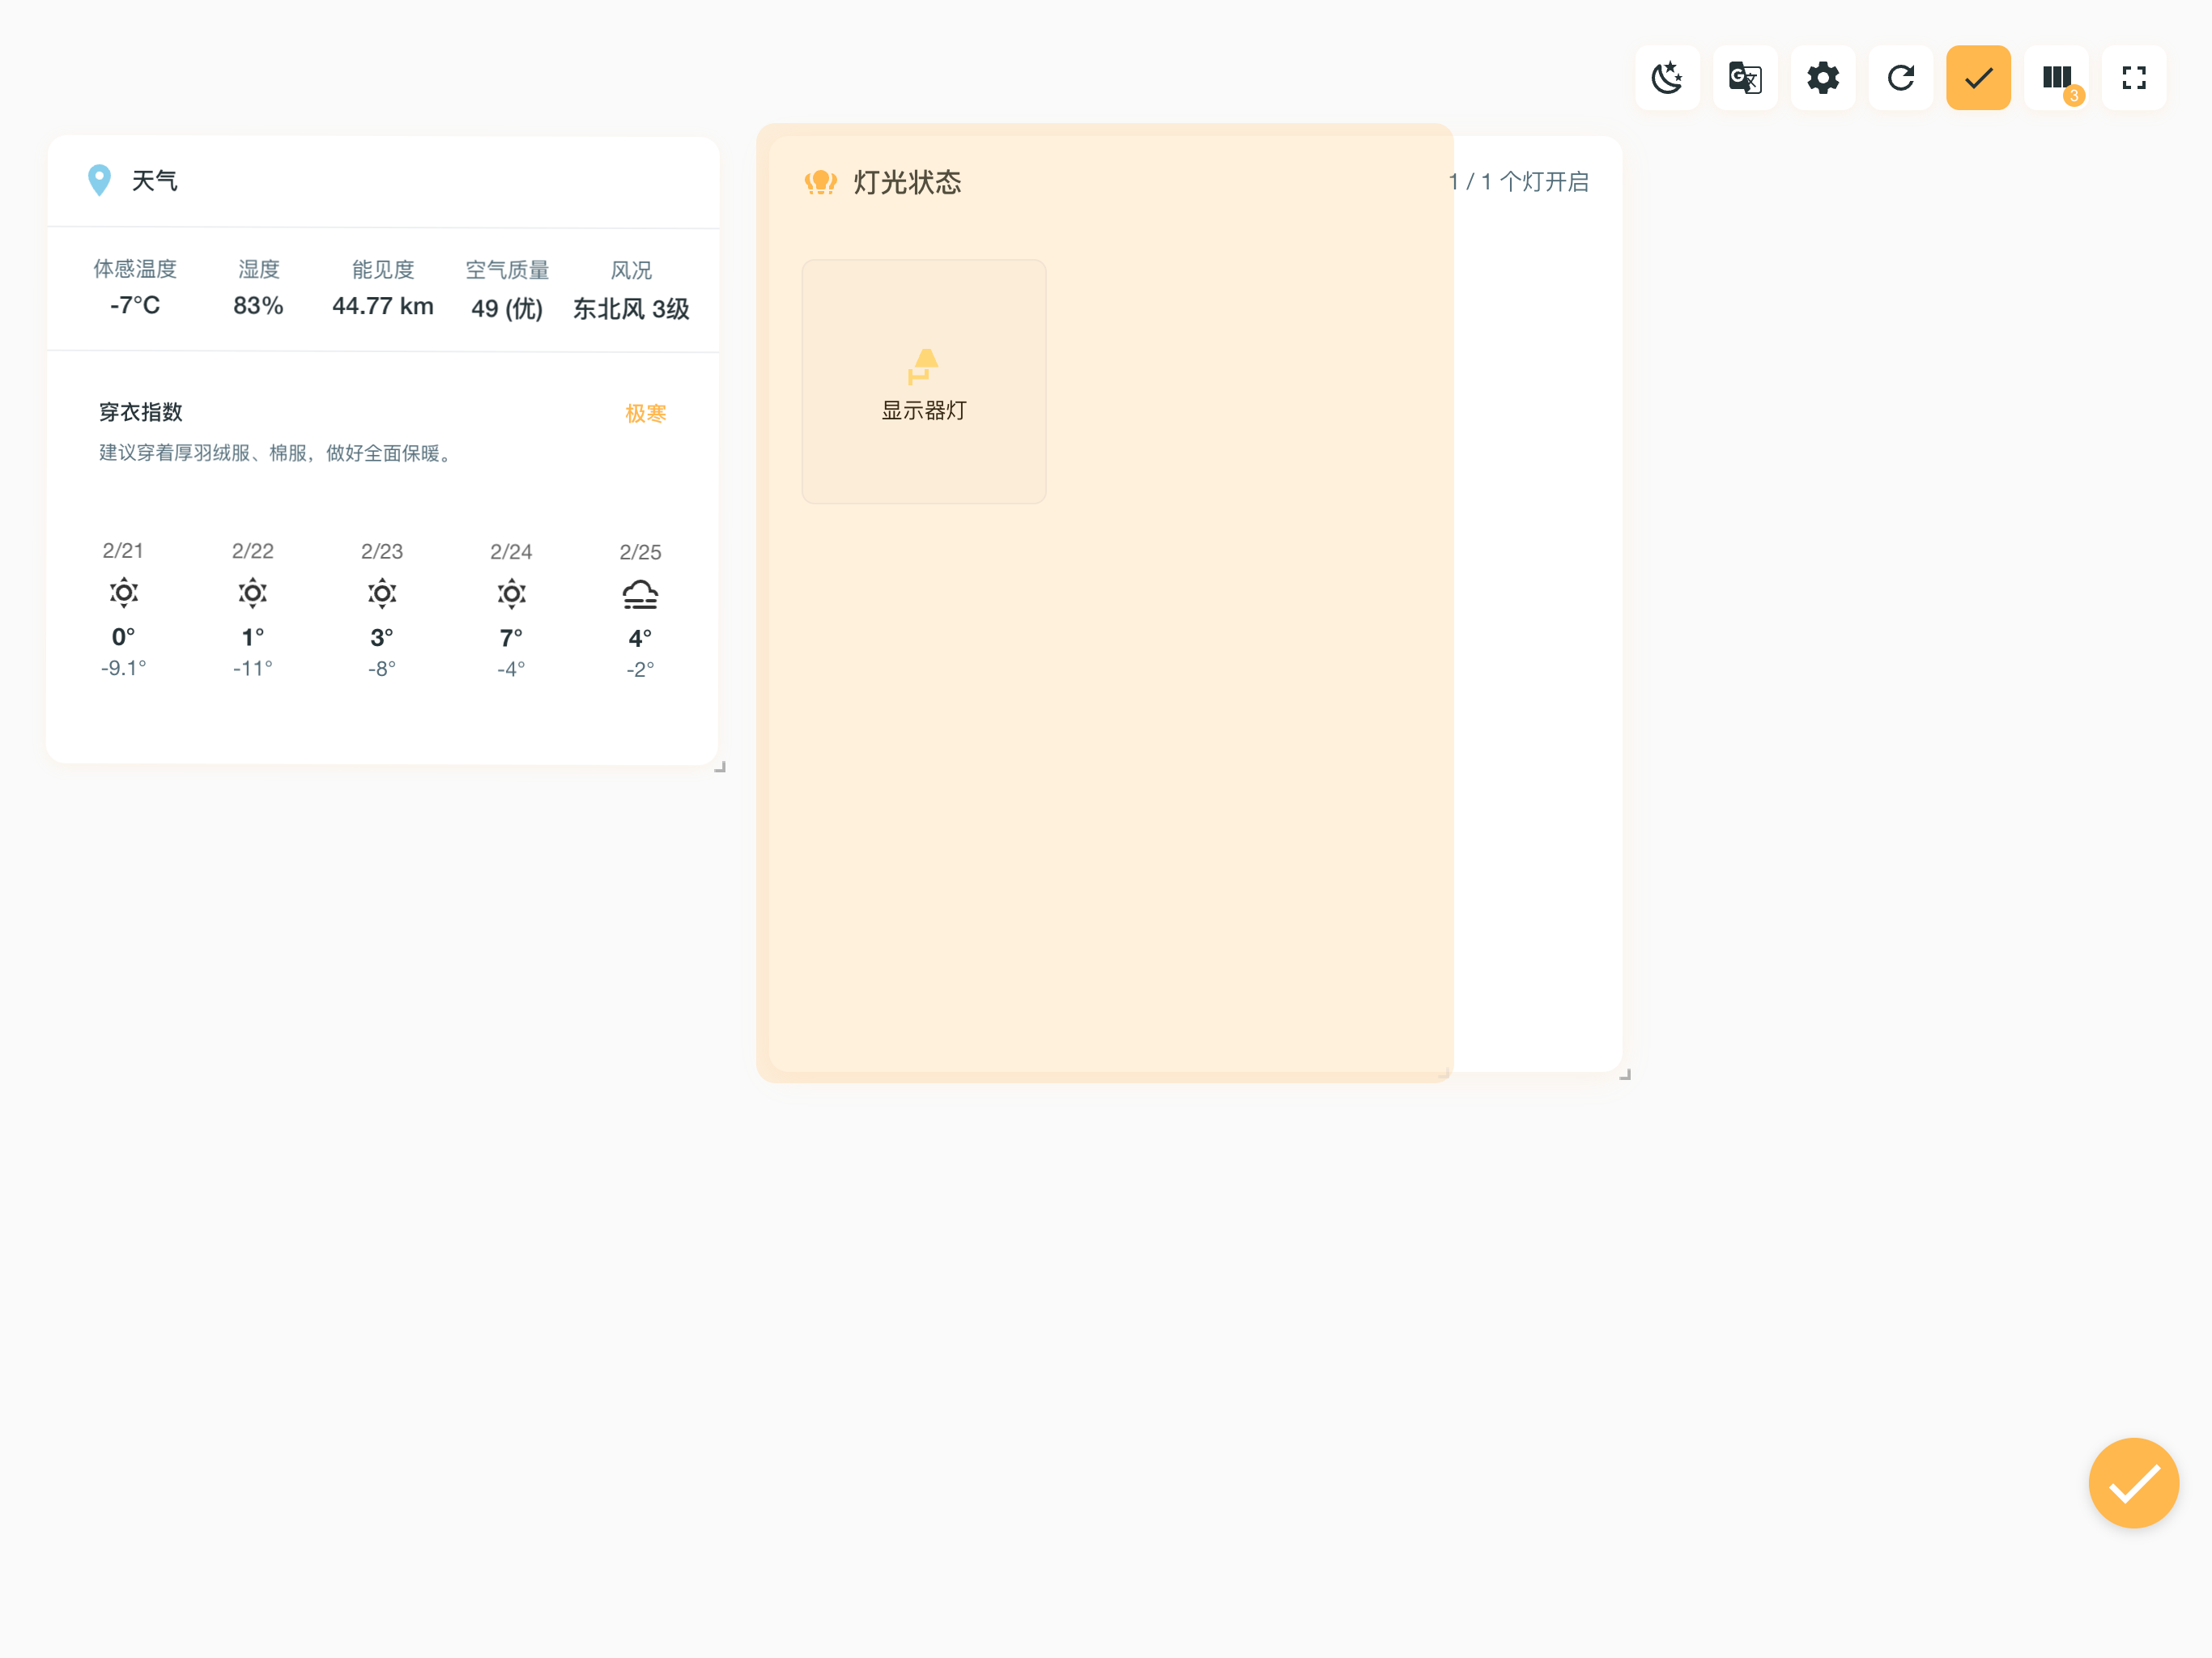
Top Toolbar
A group of function buttons is provided on the top right:
- Night Mode: Switch between dark/light themes
- Language Switch: Switch interface language
- System Settings: Enter system configuration page
- Reset Layout: Reset all cards to default layout
- Save: Save current layout changes
- Column Adjustment: Adjust display columns (with number markers)
- Fullscreen: Switch to fullscreen display mode
Card Operations
In edit mode, you can perform the following operations on cards:
- Move Position: Directly drag card to target position
- Adjust Size: Drag card bottom right corner to adjust size
- View Data: Cards display device status and data in real-time
- For example, weather card shows: feels like temperature, humidity, visibility, air quality, wind conditions, etc.
- Light status card shows: device on/off status, brightness, etc.
Layout Suggestions
-
Reasonable Grouping:
- Place related cards in close proximity
- Put frequently used cards in visual focus areas
-
Size Adjustment:
- Enlarge cards with important information
- Use larger sizes for cards with high information density
-
Column Selection:
- Choose appropriate column count based on screen size and number of cards
- Optimize display effect through column adjustment
Usage Tips
- Save layout changes regularly to avoid accidental loss
- Use reset layout to restore default layout
- Consider device usage frequency and importance when adjusting layout
- Use fullscreen mode for larger display space
8. Global Configuration
You can adjust system-related settings in the global configuration page.
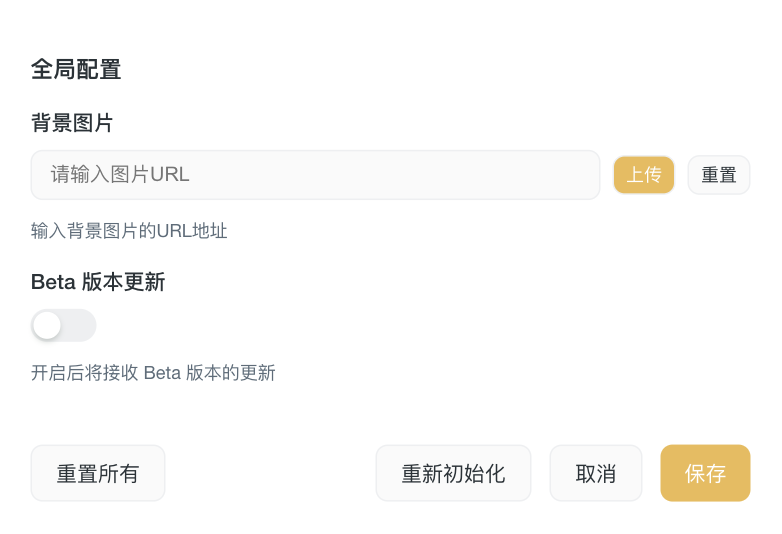
Background Settings
-
Background Image
- Support adding custom background image via URL
- Provide "Upload" button for direct local image upload
- "Reset" button to restore default background
-
Background Image Description
- Enter background image URL address
- Support web image links
- Recommend using HD images for better display effect
System Update
- Beta Version Update
- Control whether to receive Beta version updates via switch
- Will receive test version update pushes when enabled
- Recommended to use this feature in test environment
Operation Buttons
- Reset All: Restore all configurations to default state
- Re-initialize: Perform system initialization settings again (will clear user and configured Home Assistant address and Token, but preserve cards)
- Cancel: Discard current modifications and return
- Save: Confirm and save current configuration changes
Usage Recommendations
-
Pay attention to image size when changing background image, as large sizes may affect loading speed
-
Beta versions may have instability, please enable with caution
-
Test important modifications before saving to confirm effects